

A good network rack layout starts on paper, before any equipment is mounted. Add up the rack units your devices need, leave room to grow, put the heaviest kit at the bottom, keep patch panels and switches close together, separate power from data, label every cable at both ends and give the whole thing a clear path for cool air. Do those things in that order and the rack stays easy to service for years.
This guide walks through each step for an Irish small or medium-sized business, from a wall-mounted cabinet in a comms cupboard to a dedicated server room.
TL;DR
- Add up the U height of every device, then allow roughly 30% spare space for growth and ventilation before choosing a rack size.
- Place the heaviest equipment, such as UPS units, at the bottom, and keep switches and patch panels together so patch leads stay short.
- Label both ends of every cable, group and colour-code by function, use Velcro rather than zip ties, and keep data and power apart.
- Plan airflow front to back, fit blanking panels, and follow a hot aisle and cold aisle arrangement if you have more than one rack.
- Document the layout with a diagram on the rack and a copy elsewhere, so anyone can troubleshoot or expand it.
Table of Contents
- Start with a plan, not a rack
- Sizing the rack in rack units
- Where each device goes in the rack
- Cable management that survives the first year
- Power, grounding and safe access
- Server room design and cooling
- Document the layout
- Maintenance and growth
- How we can help with your rack
- FAQ
- Sources
Start with a plan, not a rack
The position of each device inside a rack affects how well it runs, how much space you get and how easily it can be serviced. Rack manufacturers advise developing a detailed equipment placement plan before installation, including provision for future expansion. That advice holds whether you are fitting out a 9U wall cabinet or a full-height floor rack.
Before you draw anything, gather four pieces of information:
- A list of every device that will live in the rack today: switches, patch panels, firewall, router, servers, NAS or backup appliance, UPS, cable managers and any camera recorder or similar kit.
- The height, depth and weight of each device, including anything that protrudes at the front or rear.
- The number of cable runs arriving from the building, and how many ports each will need on the switches.
- What you expect to add over the next three years: more staff, more access points, more storage, a second internet line.
If the room is new, or if an office move is on the cards, it helps to agree the cabling plan first. Our guide to office network cabling standards and planning explains how the runs into the rack are specified, and our page on structured cabling for office moves covers what changes when the rack has to relocate.
Sizing the rack in rack units

Rack height is measured in rack units (U). One U is 1.75 inches or 44.45 mm, and a device’s U count is its height in inches divided by 1.75, so a 5.25 inch device is 3U. Measure precisely and include the space for cable management when you add things up.
A worked example for a small office:
| Item | Height |
|---|---|
| 24-port patch panel | 1U |
| 24-port PoE switch | 1U |
| 24-port patch panel (second floor) | 1U |
| 24-port switch (second floor) | 1U |
| Firewall or router | 1U |
| Horizontal cable manager (x3) | 3U |
| Server | 2U |
| NAS or backup appliance | 2U |
| UPS | 2U |
| Shelf for ISP equipment | 2U |
| Total | 16U |
A planning rule seen in rack supplier guidance is to allow around 30% free space for future additions and ventilation. On 16U that points to a cabinet of around 21U to 22U, so a 22U floor cabinet is a sensible choice, or a 24U or 27U if you prefer a standard size above it. Wall-mounted cabinets generally suit the smaller end, around 6U to 12U, while 32U to 42U racks are typical for server rooms.
Two practical points catch people out:
- Overhead. A 42U rack rarely holds 42U of servers, because PDUs, cable managers and blanking panels take space. A realistic usable figure is 38U to 40U.
- Depth. Servers and UPS units are deep. Check the depth of your deepest device and choose a cabinet that clears it with room for cables and power connectors behind it, rounding up to the next standard depth.
The same sizing logic applies whether the equipment is new or existing. If you are buying, we supply and install hardware and can help you match the cabinet to the kit; see our hardware and software installation services.
Where each device goes in the rack
There is no single mandatory order, but a few principles produce a layout that works almost everywhere.
Heavy at the bottom. The weight of the equipment must not exceed the rack’s load rating, and heavy items such as UPS systems and battery packs belong low in the rack so it does not become top-heavy and prone to tipping. Servers and storage sit above the UPS, still in the lower half.
Network gear towards the top. Incoming cabling usually arrives from above, through a ceiling void or an overhead tray, or from the side in a wall cabinet. Patch panels and switches at or near the top keep the incoming runs short and leave the lower half free for deeper, heavier kit.
Patch panel next to switch. Alternate a patch panel, a horizontal cable manager, then a switch. A short patch lead then connects each panel port to a switch port, and the cable manager between them keeps the leads neat. Keeping that pairing consistent makes the rack readable at a glance.
Firewall and router near the top, close to the switch core. These connect to the internet line and the core switch, so keep them close to both and away from the power equipment below.
Shelf for what does not rack-mount. ISP modems and small appliances can sit on a rack shelf, labelled, rather than loose on top of the cabinet.
Spare space in the middle, not scattered. Leave the free U together so that adding a server or second switch means one clean installation, and fill gaps with blanking panels.
A sensible top-to-bottom order for a small business rack looks like this:
| Position | Equipment |
|---|---|
| Top | Fibre or ISP termination shelf, firewall, router |
| Upper | Patch panels alternating with horizontal cable managers and switches |
| Middle | Reserved space with blanking panels |
| Lower | Servers, NAS and backup appliances |
| Bottom | UPS and battery units, power distribution |
Adjust the order to suit your room, but keep the logic: weight low, network high, spare space kept together.
Cable management that survives the first year
A rack looks tidy on installation day. Whether it stays tidy depends on a few habits set at the start.
The guidance in one major rack manufacturer’s handbook is clear on the basics: label cables at both ends with a consistent method, group and colour-code them, and document the methodology, inventory and roles of each device. The same handbook recommends Velcro rather than zip ties, separating data and power cables, and routing bundles vertically along the rack or across the top.
Turning that into a working standard:
- Identify every port. Use a scheme such as rack number, panel number and port, for example R2-16-07, so a label tells an engineer exactly where a lead starts and ends.
- One colour per function. A common scheme is blue for user data, red for core uplinks, yellow for telephony and violet for security devices. Choose yours once and write it down.
- Right-length leads. Dangling slack is a safety hazard and an airflow obstruction. Keep leads as short as practical while respecting the cable’s minimum bend radius. The handbook also advises removing any cable that is not in use, because loose cables are a hazard.
- Power on one side, data on the other. Run power leads down one vertical channel and data down the opposite one.
- Never block the vents. Unmanaged cabling traps heat inside enclosures and blocks cold air distribution. In a raised-floor room that is a reason to move cabling overhead.
If you want a second perspective on routing and labelling logic from another trade, this guide to wiring and cable routing shows how the same discipline of labelling, routing and maintenance applies to access control cabling.
The quality of what sits behind the patch panel matters just as much. Our structured cabling service covers Cat5e, Cat6 and fibre termination with testing, and our comparison of Cat5e and Cat6 helps you choose the right grade before the cable lands in your rack.
Power, grounding and safe access
Power decisions shape the layout as much as network ones. Size the UPS and PDUs for the load you have plus the growth you expect, mount vertical PDUs on the side of the cabinet where possible so they do not consume rack units, and put each UPS where it can be reached and replaced without moving the equipment above it.
Earthing and bonding of cabinets must be done to the applicable electrical rules, so have a qualified electrician carry that out and test it. Do not improvise it with whatever cable is to hand.
Access matters too. The manufacturer handbook advises limiting employee access to racks, and even the room. A lockable cabinet door is the minimum for a shared comms room. If the door is controlled electronically, the wiring and labelling discipline is the same as for the rack itself, as the access control wiring example above shows.
Server room design and cooling
If your rack sits in a cupboard, cooling is mostly about keeping the door vents clear and not stacking boxes against the cabinet. If it lives in a server room, the room design becomes part of the layout.
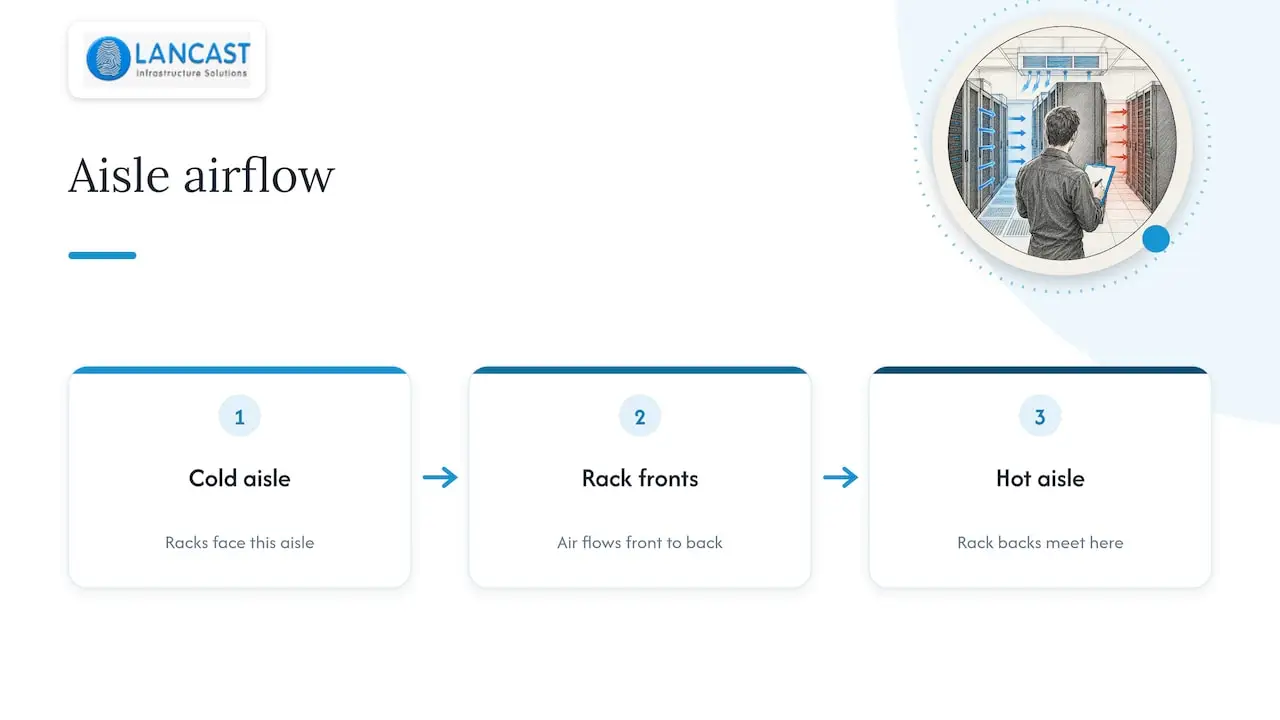
Airflow direction. Equipment should be installed so air travels front to back. The US Department of Energy’s data centre guide recommends that all equipment is installed in the racks to achieve a front-to-back airflow pattern, drawing conditioned air from cold aisles and rejecting heat into hot aisles. Rack-mount your devices all facing the same way, and avoid equipment fitted in the wrong orientation.
Hot aisle and cold aisle. For more than one rack, the Irish energy agency’s guide to server room energy efficiency states that the hot aisle and cold aisle layout is the minimum design level for all server rooms and data centres. Racks face each other across the cold aisle and back to back across the hot one. Rack makers note that this arrangement can reduce energy use by up to 20%, and baying cabinets side by side creates a barrier that discourages hot air recirculating.
Blanking panels. The SEAI guide also notes that blanking plates should be used in cabinets where future server space is allocated. Those gaps you reserved for growth need covering so hot air does not flow back to the front.
Temperature. The same guide cites ASHRAE guidance of 18°C to 27°C at the server air intake, with up to 32°C allowable. That is the intake temperature at the front of the equipment, not the room average, so measure at the front of the rack.
Cooling capacity. Size cooling from the actual heat load, the room size, insulation and expected growth, and make sure the layout gives clear front-to-rear airflow. A split air-conditioning unit that suits today’s two servers may not suit the six you add later, so confirm the sizing with a qualified mechanical contractor.
Floor loading and space. Check the floor can take the loaded cabinet and leave clear space in front and behind for opening doors and sliding servers out. A small server room layout often works best with a single row of racks against one wall, cooling at one end and a clear service aisle in front.
A small room checklist: a lockable door, no water pipes overhead, no storage of boxes or spare equipment, a dedicated power circuit with UPS, smoke detection, and a clear route for incoming cabling.
Document the layout
A rack that nobody has documented becomes a problem the day the person who built it is on holiday. The handbook recommends that, if you have more than one rack, you set a standard for uniformity, post diagrams on the side of each rack and take front and back photographs of the equipment to help with remote troubleshooting.
A useful rack diagram records:
- The U position, make, model, serial number and role of each device.
- Hostnames and IP addresses for managed equipment.
- The patch panel port to switch port map, using your labelling scheme.
- Power sources for each device: which PDU, which UPS.
- Free U, blanking panels fitted and weight limits.
- The date of the last change and who made it.
A spreadsheet, a drawing tool or a simple diagram will do, as long as there is one version, kept up to date and stored away from the rack. Drawing conventions are worth borrowing from other fields; this technical drawing checklist shows the kind of consistency in titles, scales and revision notes that makes diagrams usable by someone else.
Update the diagram every time something moves. A stale diagram is worse than none, because people trust it.
Maintenance and growth
A layout is only as good as the routine that keeps it that way. Check temperatures, UPS status, labelling and cable tidiness on a regular schedule. Our server maintenance checklist gives IT teams a short daily runbook, and server patch management covers keeping the software on that hardware current.
Backup hardware belongs in the plan too. If a NAS or backup appliance lives in the rack, give it its own reserved U and a power feed from the UPS, and read our guide to business backup and disaster recovery plans so that the hardware sits within a tested recovery process.
Our perspective
In thirty years of working with Irish businesses, we have found that the racks that cause the most trouble are rarely the ones with old equipment. They are the ones with no plan behind them: a switch squeezed in where there happened to be a gap, power and data tangled together, and a diagram that exists only in someone’s head.
We treat the rack as part of the wider infrastructure, not a box in a corner. The cabling that arrives at it, the power that feeds it, the monitoring that watches it and the backups that protect what it holds all depend on the layout being sensible and documented. That is why we design the rack, the cabling and the support arrangement together, so that the people who install it are the people who will look after it.
Our advice to any business planning a rack is to spend an hour on paper first, leave more room than you think you need, and ask whoever will support the rack to review the plan before anything is mounted. A layout designed for growth costs very little more on day one and saves a great deal of disruption later.
Carl
How we can help with your rack
We design, supply and install network racks for organisations across Ireland, including the structured cabling that feeds them and the proactive monitoring that keeps them healthy. As an HP Amplify Partner and Microsoft Cloud Service Provider, we can specify the hardware, set up the network and look after it under one of our support plans. Start with our network design and installation services, or see our managed services if you want the rack supported on an ongoing basis.

If you are planning a new room, an office move or a refit of an overcrowded cabinet, contact us through the Lancast site and we will talk through what you have and what you need.
FAQ
How much spare space should I leave in a network rack?
A common planning figure is around 30% free space, which covers ventilation and future additions. For a rack that must last three years without being replaced, some suppliers suggest planning for even more growth. Keep the spare units together and cover them with blanking panels.
What goes at the bottom of a server rack?
The heaviest equipment, usually the UPS and any battery packs, goes at the bottom so the rack does not become top-heavy. Servers and storage sit above them, with switches and patch panels towards the top, where incoming cabling arrives.
What temperature should a server room be?
The SEAI guide cites ASHRAE guidance of 18°C to 27°C at the equipment’s air intake, with up to 32°C allowable. Measure at the front of the rack rather than relying on the room thermostat.
How should I label rack cables?
Label both ends of every cable using one consistent scheme, such as rack, panel and port numbers. Colour-code by function, and keep a record of the scheme alongside your rack diagram.
Sources
- Rack Basics (rack and power equipment manufacturer guide)
- Fundamentals handbook (rack and enclosure guidance)
- Guide to ICT: Server Room Energy Efficiency (SEAI)
- Best Practices Guide for Energy-Efficient Data Center Design (US Department of Energy)
- The Rack Unit Calculator
- What rack size do you need? U, depth and weight
- Rack heights and typical uses
- Server Rack Units Explained
- Guide to wiring and cable routing
- Technical drawing checklist